
Admit it, you’re looking at a PowerGP Online Excel Report, one that replaces a Microsoft Dynamics GP Excel refreshable report, and you’re thinking: I wish I could add a field to this. I know you are, because I felt the same way when I would use the GP refreshable Excel reports.
I’ll show you how to customize our GP refreshable Excel report replacement using the XML file from our library. A couple of things to know:
- This will only work for the Table Builder feature of Jet Reports.
- This will work for any report you build using Table Builder, so go ahead and create your own XML files.
- Finally, it’s really simple!
Using a Jet Reports XML file to create a new report
Let me set the scene: I’m looking at the Account Summary Default report thinking: “I wish this report showed Balances and the Period name. I’m going to create a new report that shows the fields I want to see.”
Here are the steps I’ll take:
- Since I’m looking at the report, I’ve obviously already downloaded it from the PowerGP Online Reports Library. You’ll see from the screenshot below; it looks just like the GP Excel report.
This will work on any XML file created from the Jet Reports Table Builder. If you are not a PowerGP Online user, then you will not be able to download the file; although you can still use this concept with your own Jet Reports.

2. I’ll download the XML file from the PowerGP Online library.
3. In Excel, I’ll launch Jet Table Builder, which will open a fresh blank Excel workbook.
Jet | Design Tools | Table Builder

4. When the new workbook launches, the Table Builder pop up window will appear. Click on File | Open.

5. Find and select your XML file and click Open. The Report Layout will appear based on how it was created.

6. Select the fields you want to add by checking on the corresponding check boxes.
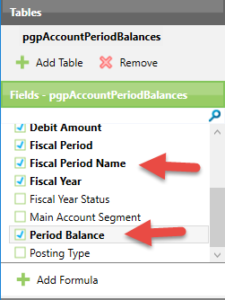
7. Drag and drop the fields to place them in the order you want them, or you can highlight on one at a time and use the arrows at the bottom.

8. Click OK to save and apply your work. As the Table Builder window closes, you’ll be asked if you want to save your changes to the template (XML) file. Click on your answer.

9. You’ll end up in Design mode looking at your new report.

10. Refresh your report using the Jet Refresh and your data will appear with the changes.
Jet | Modes | Refresh

See, it’s simple. The Jet Reports XML file is used a template for creating a new Jet Table Builder report. Each time we build or edit a report using the Table Builder, we’ll be prompted to save our work in a template (XLM) file. The files are small, so it’s perfect to use for Ad Hoc reporting as well.
Another easy way to Power GP like a Pro!
Watch the Video to see how easy reporting is with PowerGP Online and Jet.